Visual Aids
"Welcome to our visual aids page. It is said that one picture is worth a thousand words, if that's true this page will be worth one heck of a lot of words!
Considering all the questions we've received on our FAQ page we felt it would be a lot more informative if we added visual information to our website as well. When it comes to handling and processing your venison we feel you will find the information on this page easier to understand than "a thousand words."
Why people don't like to eat venison?
Click here to open document in Adobe Acrobat reader.
How to bone the front shoulder?
Click here to open document in Adobe Acrobat reader.
 Deer Cysts

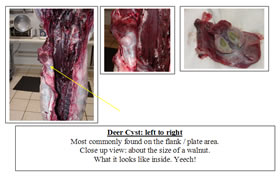
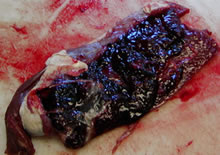
In processing I would venture a guess that we find cysts in one out of ten deer. While ugly to look at, they do not affect the rest of the animal. We remove them with at bit of border and discard. As you can see by the picture on the right, you would, not want to grind them. Click image to enlarge >
Useful Tips When processing venison it always helps to have any advantage you can to help speed up the operation. Here are a couple of the things we use to make the job easier. Maybe you'll want to give them a try too. |
|
|
|
When to freeze your deer?
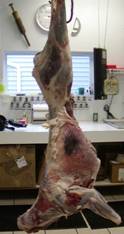
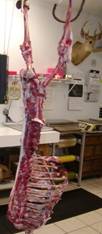
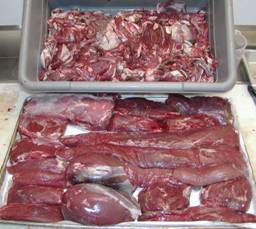
This deer was shot on Nov. 18 and processed on Feb. 10. After field dressing it was placed whole in a chest freezer. Note the excellent condition of the carcass after skinning, and the condition and amount of boneless cuts and trim that were secured. If you can't process your deer soon after harvest then we recommend you consider freezing it whole.
Note: To further protect the tenderloins, cover them with plastic wrap or waxed paper when freezing.
 1952 - 1962 Deer Harvest Figures
(click chart to enlarge)
You sometimes hear people talking about the "good old days", but if you think hunting was better then, you had better look at these harvest figures! I know how tough it was, I got to hunt deer for the first time in '64 and it was '69 before I even saw a buck! Give me the deer hunting of today!
Shot Placement
One thing that I have seen mentioned by several processors is the importance of your shot placement in relation to yield of usable meat. While I agree that shot placement is very important for a quick, clean, and humane manner of taking your deer, I don't personally use that as a way of telling my customers not to expect a reasonable amount of meat back.
In my experience I have found that the clotting and jelling resulting from the impact of the shot normally forms in the layers of tissue "between" the actual muscles. Normally I find little damage to the actual "meat" in the shot area. The worst losses normally occur when shooting through bone. However if you take your time you will be able to utilize a lot of the meat from that area, that others would throw away.
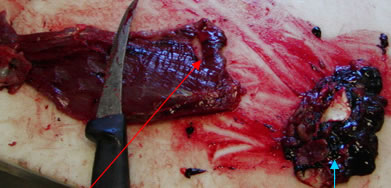
The pictures below illustrate how I salvage the meat in a shot area. This meat is from the brisket/ rib area and shows the result of 180-grain soft point. You can see that the meat on the left picture is covered in coagulated blood (clots). By scraping the clots off with the edge of my knife and am able to salvage the muscle meat lying below. (Note the hole from the bullet on the cleaned piece.)
In many cases this piece would have been discarded by the hunter/processor. Next time you cut your deer, try scraping the blood shot areas with the edge of your knife. You will be surprised at how much usable meat you might have thrown away.
|
|
London Broils
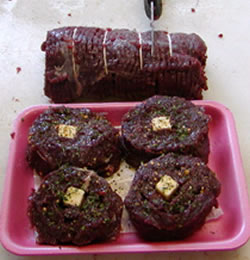
The pictures below illustrate a way of making "London Broils" out of venison. Keep in mind because there are several ways that London Broils are presented across the country, it's possible that this may not resemble the way you are used to seeing them. However I assure you that the eating quality makes up for any appearance difference.
What we do is to take the Top Round, Bottom Round, Sirloin Tip, or a section of boneless backstrap and carefully "unroll" it. [It would be like unrolling a JellyRoll.] Run the unrolled piece once through a meat tenderizer, spray with Olive Oil, and season with a Montreal Style Seasoning. We then place one quarter of a stick of margarine or butter on one end and roll back into the original shape. Tie in four equal pieces and cut between the strings to make four broils. Spray tops and bottoms with Olive Oil and season. Grill to 150º and enjoy. Click images to enlarge.


"Shooter Sausage"
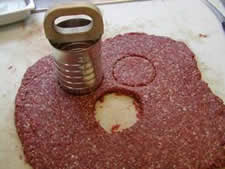
It seems that a lot of people would like to make fresh sausage but feel it's too complicated or requires expensive equipment to accomplish. Here's an idea that came to mind as I was driving to work one morning. And you know what? It's easy, inexpensive, and it works!
Click images to enlarge
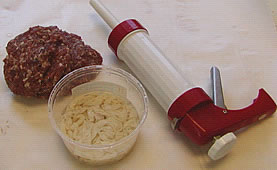 Supplies needed:
1) Jerky shooter.
2) 1# Seasoned sausage.
3) 18"- 20" Hog Casing (rinsed)
 Instructions:
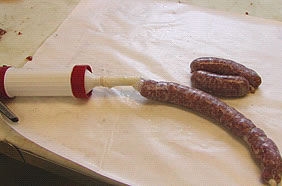
Fill shooter with sausage, and squeeze the trigger until the meat is at the end of the nozzle.
Place casing on the nozzle and tie a knot in the end. Keep squeezing the trigger to fill the casing.
click image to enlarge
 Finish
Twist your links.
Note: With the size shooter I have, I was able to make two links per fill of the shooter tube.
Location on venison lymph nodes
 Location of Round Lymph Nodes - (click image to enlarge)
Lymph node is inside of the fat located inside the round between the Top and Bottom Round. [Remove the heel piece and the fat will be exposed] - Click image to enlarge
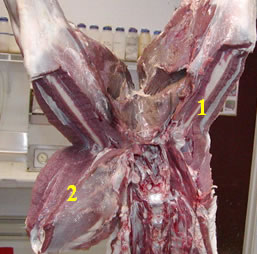
Location of Venison Shoulder Lymph Nodes - (click images to enlarge)
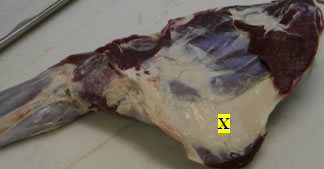
The Lymph node is located inside the fat deposit on the inside top of the shoulder.
Location of Sirloin Tip Lymph Nodes - (click images to enlarge)

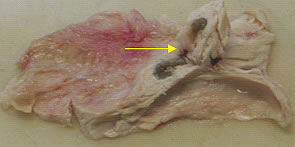
The Lymph node is located inside the fat deposit found at the front of the Sirloin Tip.
[Note: The one on the right of the picture has already been removed.]
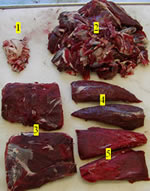 Boneless Yield from 2 Venison Front Shoulders.
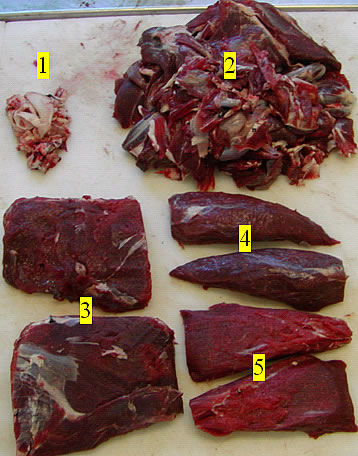
1) Fat / Waste
2) Trim For Grinding
3) English (Shoulder) Roast
4) Whole Mock Tender Steaks
5) Whole Top Blade Steaks
Note: 3, 4, & 5 work well for Corned Venison.
Click image to enlarge
Boning the Round
 Removing the Tip
1: Tip already off.
2: Tip in the process of being removed.
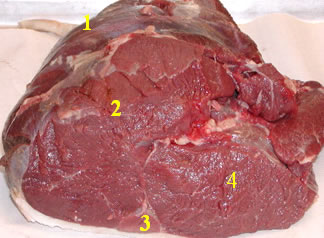 Sections of Boneless Round
1: Heel of Round (In the back)
2: Top Round
3: Eye of Round
4: Bottom Round
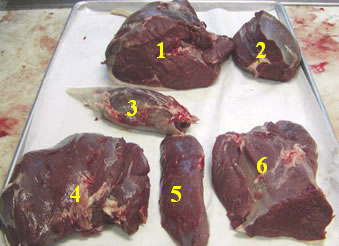 Round Primals
1: Boneless Round
2: Sirloin Tip
3: Heel of Round
4: Top Round
5: Eye of Round
6: Bottom Round
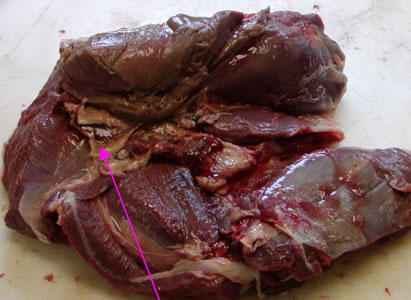
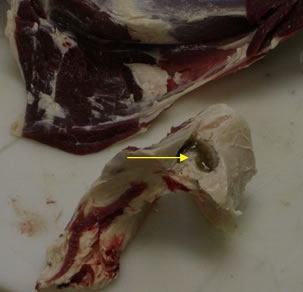
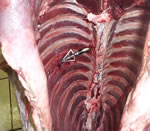 Use Caution when handling bow kills!
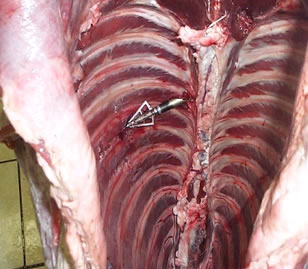
When you go to recover your bow kill be sure to locate the arrow and broadhead. If you do not find the broadhead use extreme Caution when field dressing and processing! When this deer was brought in this is how we found the broadhead. Luckily the hunter was not injured when field dressing.
 Maximize Your Neck Roast
One of the best roasts for the slow cooker is the boneless neck roast. Unfortunately many hunters throw the neck away or "short cut it" and lose over half of it.
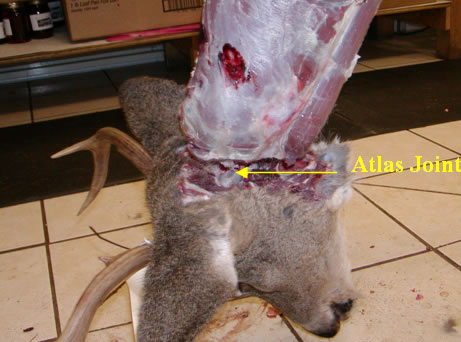 To maximize the neck, skin all the way down to the ears and then cut the hide off. Cut around the neck, and through the esophagus. Now grab the antlers (ears on a doe)and the nose, and twist the head until it cracks. You should now be able to finish removing the head by cutting through the atlas joint with your knife
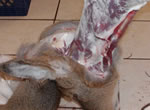
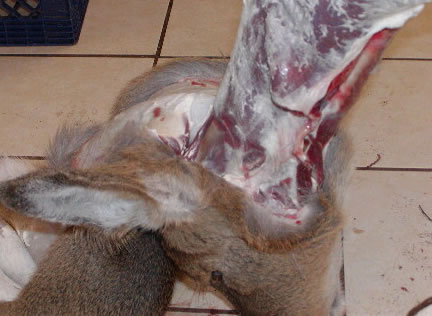
How to bag a buck (or doe)
 Did you ever notice when you hang your deer with the head down, it can result in a bloody mess on your garage or cooler floor? Our daughter Kaytee came up with the solution to that problem.
Using a plastic grocery bag, slip it over the deer's head and hook the handles on the antlers or ears. Now all the leakage runs into the bag and not all over your floor. Yea Kaytee! :-)
Bone up on your crafts!
 Utilize even more of the animal you harvest. The Elk blade-bone on the left is a Xmas present I received from my daughter Kaytee. After scraping the excess meat off, she boiled it in borax and then allowed it to dry. Next she commissioned local artist Mr. Ron Jackson (906-863-6092) to paint the scene on it. Below it is a venison blade-bone that could be used in the same manner. Isn't that a heck of a project for a cold winter's night? Sure would look nice at deer camp!
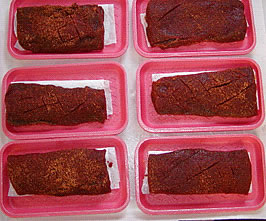
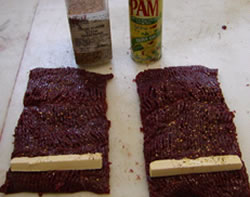
Venison: Seasoned Boneless Baby Backribs
If you're tired of the same old venison chops try this: cut each backstrap into three pieces. Next cut each piece in half lengthwise and score in a diamond pattern on one side. Roll in Smokehouse BBQ Seasoning (you can purchase it in our online store) or baste with your favorite BBQ sauce, grill to 145 - 150 degrees. - click images to enlarge